Thursday, 6 March 2014

Chocolate Guinness Cake Pops - Celebrate St Patrick's Day


I confess, I've never made a cake pop in my life before (although I've eaten a fair few!).  I was inspired by A Mummy Too's post last week with a brilliant tutorial - that and the rising panic when I realised I'd promised Ruby cake pops for her party bags next week.  So it was time for a trial run.

Flicking through Nigella's Feast recipe book (one of my all time favourites), I stumbled upon her recipe for Chocolate Guinness Cake, so decided to give that a whirl for St Patrick's Day.

The cake came out incredibly well, I was so chuffed with it.  Rich, dense and moist, almost like a fudge cake, but with the iron rich twang of the black stuff.

It was so moist and dense, it molded perfectly in my hands to form cake balls, without the need to add and frosting at all.


I would suggest halving the quantities Nigella uses - it makes a beast of a cake.  About one quarter of it made me 9 cake pops!  So here it is, roughly halved, just use a smaller cake tin say around 7 inches. I'd also add that I had no sour cream, so instead I used a combination of milk and cream cheese, and it seemed to work well.


Cake Ingredients:

125 ml Guinness
125g  unsalted butter
35g cocoa powder
200g caster sugar
75 ml sour cream
1 large egg
1/2 tablespoon vanilla extract
160g plain flour
1 large teaspoon bicarb of soda

Decorating Ingredients & Equipment:

1 pack green candy melts (available in baking stores, hobby shops or online)
20 cake pop sticks
green sprinkles (I found shamrocks on ebay)

1. Preheat the oven to gas mark 4/180°C/350ºF, and butter and line a 23cm / 9 inch springform tin.
2. Pour the Guinness into a large saucepan, add the butter in cubes and heat until the butter's melted. Then whisk in the cocoa and sugar. Beat the sour cream with the eggs and vanilla and then pour into the buttery beer and finally whisk in the flour and bicarb.
3. Pour the cake batter into the greased and lined tin and bake for 45 minutes. Leave to cool completely in the tin on a cooling rack.

      
     Head over to Emily's blog for full details on how to make up the cake pops from here if you haven't made them before, but remember, you won't need frosting with this cake.


Keynko A Crafty Family

and featured on Fun Crafts Kids 

Wednesday, 5 March 2014

Quick Easter Craft - Bunny Ears Sweetie Jar


A simple and fun way of dressing up an Easter gift.

So easy to make, you need:

Bunny ears headband (mine was from a pound store)
Large jar such as a coffee jar
White paint
Ribbon and pompom

First paint your lid white.  Once it's dry, remove the ears from the headband using a sturdy pair of scissors (these are wired ears, so you need to cut through that).

Fill your jar with marshmallows or similar treats.  Screw on the lid, then using strong glue or a hot glue gun, fix the ears to the lid.

Tie with a pretty bow and glue a white pompom on it's tush!


A fun and easy way to give an Easter gift for only around £2!

Do watch the hangout video and check out the links below for loads more fab bunny crafts:


Red Ted Art: Knitted Bunny; Egg Bunny; Paper Mache Bunny Basket; Loo Roll Bunny; Carrot Cakes
Kids Chaos: Carrot Supo; Bunny Biscuits; Pompom Bunnies; Denim Bunny Pockets
Zing Zing Tree: Peg Bunnies; Felted Bunny; Die Cut Bunny Bunting and cards.
Domestic Goddesque: Milk Carton Bunny Ears (you could make these for this jar craft instead of buying them); Pipecleaner Bunnies; Fingerprint Bunny Tail Cards; Sock Bunny
Me and My Shadow: Bunny Easter Cards; Bunny Bread Rolls and Bento Lunch

What's your favourite Easter craft?  Don't forget to join in with the #GetYourCraftOn challenge this month.

Get Your Craft On for Easter

The fabulous #GetYourCraftOn challenge is now in it's 3rd month and it's my turn to host - yippee!

I can't wait to see all your fabulous creations.

So how does it work?

We're asking you to get creative around this month's theme which is ... drumroll please...

Chicks and Eggs!


Please share your photos - whether it's completed projects; work in progress; food; fabric; junk modelling - whatever.

Link up below and follow the #GetYourCraftOn hashtag on Instagram and social media.

We had so many amazing entries in last month's St Patrick's Day challenge, and you can see them all over on Kids Chaos blog, together with her pick of her favourites.

Make sure you're following all the team member's accounts on Instagram:


@incredibusy @redtedart @domesticgoddesq @bluebearwood &@missielizzie and do go and find some new friends through Instagram and their blogs.
Let's get cracking! You have until midnight on Friday 28th March to join, and then I'll be picking my favourites.


Wow!  Over 50 amazing chicken and egg related makes and bakes, all just perfect for Easter.

It was tough to pick out me favourites, but I've chosen Damson Lane's brilliant Hatching Chick - a great recycling craft; Powerful Mothering's glorious salt dough eggs because they were so vibrant and tactile looking; Let's Play Kids Music's super-cute chick puppets in a nest - because it's not just a craft but a song; Lucy's Madhouse's chick prints because of their wonderful simplicity; Mammasaurus' Creme Egg quiche because it made my mouth dribble a little bit and this wonderful Easter surprise chicken card by Hugo and Mathilda because this clever idea made me smile!

There are tonnes more amazing ideas below, do check them out for your Easter crafting inspiration.
Don't forget also to head over to Red Ted Art where the next #GetYourCraftOn challenge is now live.  Why not join in this month.

Tuesday, 4 March 2014

Bunny Bento Lunch Box with Bunny Rolls


We love our themed lunchboxes, and with Easter just around the corner, it's the perfect excuse for a bunny themed box.

I made some cute bunny bread rolls which are super easy to make.

Ingredients:


  • 260g strong white bread flour
  • 1 tablespoon butter or vegetable oil
  • 1/2 tsp salt
  • 1/2 tsp sugar
  • 1 tsp dried yeast
  • 150 ml warm water
  • 1 egg yolk (to glaze)


Mix up all the dough ingredients using a dough hook on your mixer if you have one - or by hand.
Leave in the bowl and cover with a clean tea towel and leave in a warm place for 1 hour until doubled in size.
Divide into 8 equal pieces.  From each piece, snip off a small section from the corner to make the tail.
Roll each large piece between your hands to make a long sausage shape.  Roll the small piece into a ball.
Wrap the sausage around the tail, crossing over at the top to form the ears.
Place on a greased tray.
Cover with a towel again and leave to prove for 20 minutes.  Preheat the oven to 200 degrees c.
Brush with beaten egg yolk.
Bake for 8-10 minutes until golden brown.  They should sound hollow to tap underneath.


For the rest of the box, we had some fun on the bunny theme:

Carrot cake
Popcorn 'cotton tails'
Carrots (trimmed and topped with parsley 'leaves')
Bunny whoopsies (raisins)
Orange coloured waxed cheese
Bunny dip (hummus)
Bunny bread roll


What will you put in your Easter lunchbox?

This post/ photo is an entry into the Tots100 #Cloudy2Competition.


Barbie the Pearl Princess - and 10 Mermaid Activities

We recently went along to Vue cinema for a special screening of the brand new Barbie film, Barbie the Pearl Princess.

Vue cinemas offer great family viewing with weekend movies for the kids from only £1.75 as part of their Kids AM package.

We were treated to delicious princess cake pops by Kimberley Cake Pops and wands and tiaras for all the little attendees by Fancy Dress Ball together with fabulous face painting.


Ruby loves all things Barbie, so naturally enjoyed the film.  I quite liked the fact that all the positive lead characters were female, and that the heroine didn't need to 'find a man' to fulfil her destiny - that makes a change!

So after the film screening and the Barbie Mermaid swim session the previous week, we've been submersed in all things mermaid ever since.


1. Mermaid Bath-time:

I set up a special mermaid treat for Ruby's bathtime last night.  She's almost grown out of playing with toys in the bath, but she loved the 'spa experience' of this.  I found some 'underwater' relaxing spa music to play, set up the bathroom with crepe paper 'seaweed' and made up a door sign with my Cricut Mini from some holographic paper salvaged from a gift bag.


To add to the underwater vibe, we coloured the bath water with a green bathbomb and added some shells to pour and play with.  We listened to the shells to see if we could hear the ocean.


The bathroom was lit with seashell candles (learn how to make them here), and she was allowed to wear a special 'mermaid necklace' in the water.


This was such a big hit!  She LOVED her special mermaid bathtime, and has already asked when we can do it again.

2. Discovering Pearls -Magical Activity

Family Days, Tried and Tested has some fabulous activities on her blog and Facebook page.  I love how she makes even the mundane magical, and this pearl activity is no exception.  Check it out on her Facebook page.

3. Make a Treasure Chest

Hodge Podge Craft has this wonderful mini treasure box to make on her blog - just perfect for keeping your pearls and jewels in. Or you could try my tutorial for DIY pirate treasure gold coins.


4. Make a no-sew Mermaid Tail

Green Mum's Blog has this clever tutorial for a simple mermaid's tail - perfect for dressing up.  I love the clever upcycling here.


5. Clothes Peg Mermaids

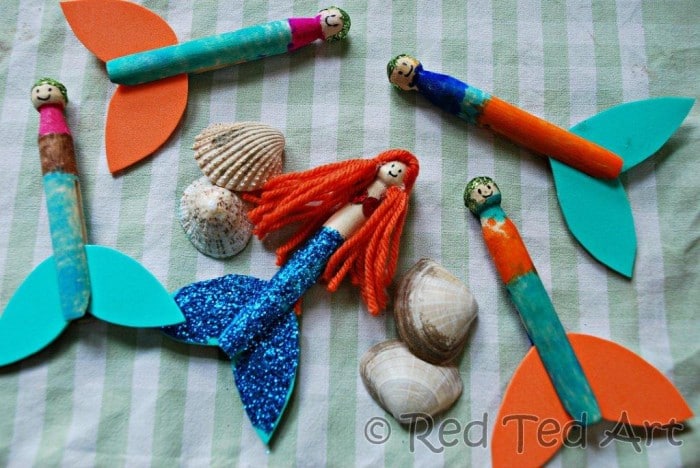
Red Ted Art has these adorable mermaids made from pegs.  You're bound to have everything you need at home to make these lovelies.


6. Loo Roll Mermaids

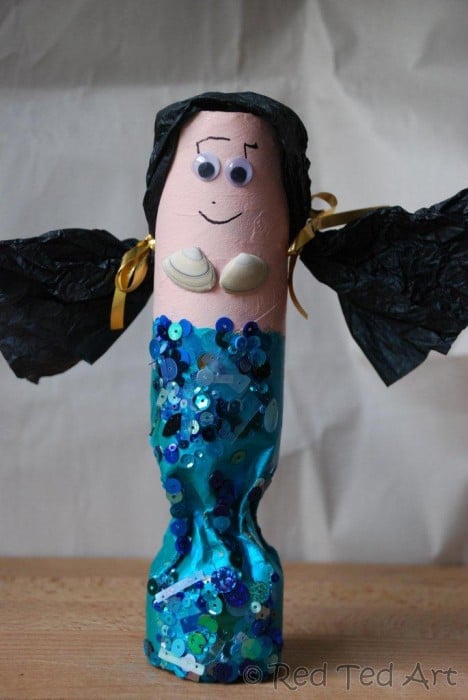
Red Ted Art also has these toilet roll tube mermaids - again, I love something made out of junk.


7. Sea Shell Box

We made this little keepsake shell box a while ago after a trip to the beach. Ruby still uses it to keep her little treasures in.


8. Sea Shell Picture Frame

Here Come the Girls makes this delightful sea shell picture frame. Perfect for photos of your little mermaids!


9. Make a Jelly Fish

Green Mum's Blog again, this time with a fabulous jelly fish you can make. Perfect for party decor.


10. Mermaid seascape in a jar

I made this seaside in a jar to show off our collection of beach finds last year.  So simple to make as a holiday keepsake, and a mermaid adds a little fantasy to it!


  Do you have a favourite mermaid craft? Have you seen the Barbie Pearl Princess film yet?

Monday, 3 March 2014

Best Money-saving life hacks

I don't know how I managed to live without all those nifty little ideas shared on Pinterest and social media.  A couple of years ago I'd never heard of the expression 'life hack' but now people are 'hacking' left, right and centre.

I thought I'd share some of my favourite nuggets I've found which make life that little bit easier, and save you money too.

1. Food Waste

This is a big drain on the household finances, so any tips to make sure I don't waste food are always welcomed.

This is a great idea to make sure you can get to all your jars and bottles at the back of your fridge - how many times have you found out of date stuff languishing at the back because you just can't see it?  Via Buzzfeed.com


We have a big larder in our kitchen and it's piled with multi-buys and special offer purchases.  It can be hard to see exactly what I've got, and makes writing a shopping list tricky, so this is an ingenous idea to keep all your tins neat and to hand. Via PB & J Stories.


2. Don't over dollop!

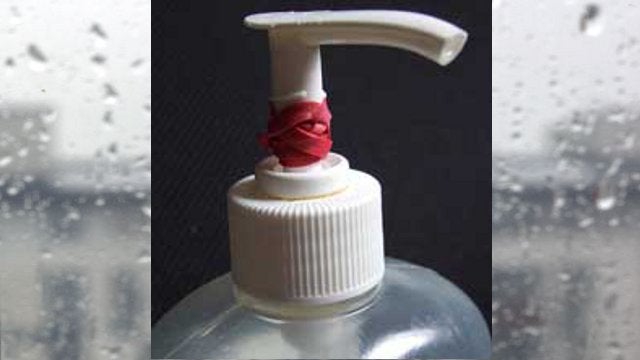
I wrote a little while ago about how one simple change of mindset can save so much money when it comes to toiletries and products.  However, it's not so easy to get kids into the habit of frugal use, which is why I love this idea.  The elastic band prevents the pump dispenser being depressed too much and saves excessive use. Via Marc and Angel Hack Life.


3. Make-over your junk

Regular readers will know how I love to upcycle old junk, or tart up tatty bits that I've picked up in junk stores.  It means I can fill my house with pretty for not too many pennies.

One of my all time favourite blog posts in this one by Lulastic on how to make your own chalkboard paint. It's absolutely genius, it's saved me tonnes of money on make-over projects and best of all you're not limited to black blackboard paint - you can make all colours of the rainbow!  Here's a thrifted tray I painted up.


4. Spruce up your dingy towels

Before you sling out your faded old towels or even bed linen and splash out on new, try dyeing it to give it a new lease of life.  If you're redecorating, it can be an added expense buying new linen to co-ordinate, but if you have cotton and it's still in good condition, a packet of machine dye will turn it into a whole new set.


5. Ditch the Takeaway

One of my worst money-wasting habits is to reach for the takeaway menu after a busy day.  It's not just that it's so easy, it's that I actually LOVE takeaway food - fish and chips; pizza; Chinese... you name it.  But in actual fact, by the time you've collected it, or had it delivered, it's not really that much quicker.

The lastest food craze is for 'Fakeaways', so next time you fancy something a little naughty, instead of picking up the phone, try out a DIY version.  It'll not only be cheaper, but it will be healthier too.  Some of my favourites are:

Chinese pancakes by A Bavarian Sojourn.


Chicken kebabs from All You Need is Love and Cake.


Chicken Fried Rice from The Crazy Kitchen.


Slimming World friendly Chinese Fakeaway by A Seasider in the City.


What are your top money-saving life-hacks?

Disclosure:  This post is in association with VoucherCodes.co.uk

Magpie Monday - How to make seashell candles

The best things in life really are free.

Over half term we spent the week in Wales, miles from anywhere, hardly another sole in sight - let alone a charity shop.  And do you know what, it was ok!  I survived.  It was better than ok in fact.  We hardly spent a penny all week, we filled our lungs with fresh air and we had FUN!

We did manage to do a little magpieing, and came up trumps at the beach.  We visited Harlech and Fairbourne which were both stunning.  Because our half term was a week before the Welsh kids broke up, we had miles and miles of golden sand to ourselves.


We went hunting for treasure in the rock pools and along the shore line.

These beaches came up trumps with enormous freshwater clam shells from the estuary, and giant cockle shells.

This was us singing the lesser known One Direction track "Best shell ever", which we broke out into every few yards as each find superseded the last.


Back home, I decided to turn some of these finds into useful objects.  A thorough clean and scrub was required first.


Then I melted some tealight candles in a bowl over a pan of water on the stove - you need one tealight per shell.

Choose large shells which are fairly deep and test them on the worktop to make sure they stand level.

When the tealights have melted, fish out the wicks, still in their little metal retainers with a spoon.  Carefully stand the wick and retainer in the centre of your shell and leave the residual wax to firm and hold it in place.

Then carefully pour in the wax to about 2/3 full.

Leave to cool and set.

How to make candles in sea shells

These little seaside candles would be great for a summer party or barbecue, nautical themed home decor, or check back tomorrow to see what we used ours for.

Safety notes: Never leave burning candles unattended.  Ensure they are standing on a level, protected surface. Better still, nestle them into some play sand on a plate or tray to make sure they stand still.

What have you managed to find lately?  Have you salvaged, upcycled or re-used something?

Please grab the badge and link up your second-hand finds.