Monday, 8 April 2013

Magpie Monday - Spring Greens

Apologies for my slackness last week.  The Easter holidays have been full-on, and I forgot what it was like to have Ruby at home full-time!  I promise I will catch up on last week's link ups as soon as I can.

We've had a busy week, but managed to squeeze in an adults-only weekend away which was bliss.  We stayed on a cottage boat - a static canal barge with Clifton Cruisers, and it was the perfect break.

The boat is moored in the village of Clifton just outside Rugby and there's plenty to see and do in the area. We had walks and a cycle ride along the tow paths, the Old Man found an old quarry pit to indulge his passion for outdoor swimming in, we had a fabulous night at the boatyard's dinner club joining their Australian themed evening.  The bustling and historic Warwick, Leamington Spa, and Coventry are all nearby.

Rugby is just a few minutes drive away, and it was to here I gravitated on the Saturday.  Last time we visited I was in seventh heaven with the amount of charity shops in town, and I overheard one customer proclaim that Rugby boasted 18 in total.  I'm sure that's right, and it even has a charity shop attached to the tip (of course, we managed a detour to visit this too!)

Unlike a lot of towns which have an abundance of charity shops, Rugby is still a thriving centre, with lots of independent shops, boutiques and lovely bistros and cafes - try the amazing Somersault vegetarian restaurant and deli or the Cafe Vin Cinq French bistro next door.

So, enough of the tourist information, what did I buy?

Well sadly the Old Man wasn't 'in the zone' which was annoying as I'd traipsed round muddy lakes for him earlier in the morning and held his clothes while he swam...

I did manage to buy some lovely spring clothes though, both for myself and Ruby.  I spotted this dress and looked to him for approval.  He wrinkled his face, ummed and finally declared that it reminded him of an old pair of kitchen curtains.


Green light for me then.  Any dress that looks like a pair of vintage curtains is a winner for me, so I ignored his exasperated why-do-you-ask-my-opinion-then-ignore-it look, and paid the £6 price tag.

I also bought this cute little blouse which I thought would look nice with jeans on a sunny spring day.


I like the detail of the gingham edging and the mother-of-pearl buttons.


For Ruby I found this pretty broderie anglaise dress with green print.


It has a lovely big bow at the back.


She also got this sparkly Next T shirt with ruched sides.


I also treated her to a Sylvanian Families Riverside Lodge house for £7 - a quick Google search on my phone told me these cost about £45, so I snapped that up sharpish.

All in all, a pretty perfect weekend!

What have you been up to?  Has boot sale season started where you are yet?

Grab the badge and link up your second-hand finds.

Me and My Shadow

Thursday, 4 April 2013

Orchard Toys - Pirate Shapes Review

It's no secret that we love Orchard Toys in our house.

They offer great value for money; brilliant quality; British made educational board games and puzzles.  As we have a bit of a family tradition of playing a board game after dinner together, you can imagine, we already have quite a lot from their range.

But we're always happy to give a new game a whirl, and Orchard Toys were kind enough to send us Pirate Shapes.


To be perfectly honest, Ruby was not at first impressed.  She'd noticed the label on the front which suggests the game is suitable from ages 2 1/2 upwards.  Being 5 now, and oh such a grown up girl, she decided that this was "too babyish" and that she "already knows shapes". Huh!

To be fair, we have this problem now with a lot of toys and games.  Anything with small parts seems to say suitable for 3 and over, so she automatically takes this to mean they are for 3 year olds.  I've explained and explained...

Anyway, we cracked on with the game, and she was proved wrong.  She loved the game.  Granted, it would be brilliant for younger children just getting to grips with shape recognition, but there is enough fun about it to work as a game in it's own right.

It encourages turn-taking; colour matching; shape recognition; observation skills, memory and co-ordination.


The game is suitable for 2, 3 or 4 players, and we love to play this together as a family.  As with all Orchard Toys, the board and pieces are sturdy and built to last.  They even offer a part replacement service should you loose a piece.  Which reminds me, I really must do an audit of our toy cupboards because I know we have a few pieces that have been mislaid.

Disclosure: We were sent this game for the purposes of this review.  All opinions expressed are my own.

How to dye feathers


Just because a product says 'fabric dye' it doesn't mean you have to limit your imagination there.

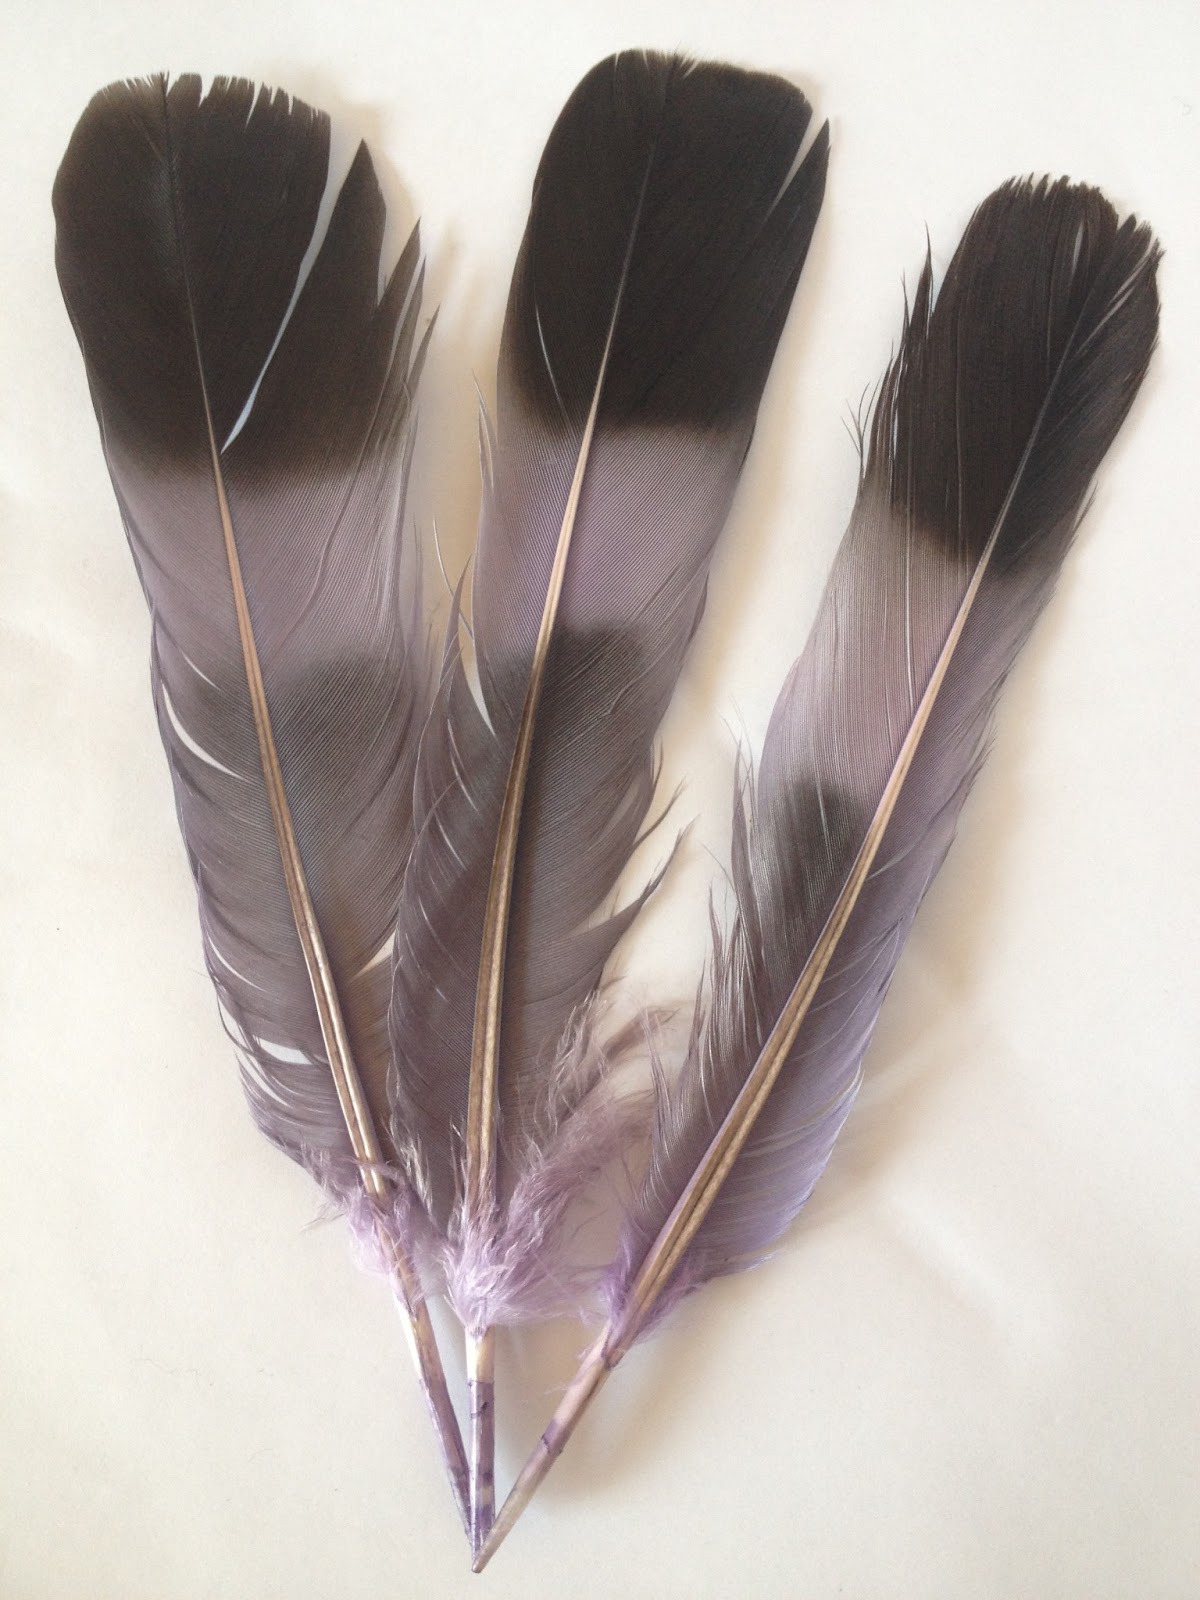
On a family walk along the river, we picked up lots of feathers kindly discarded by the swans and geese, so we tried our hand at dyeing them.

Springtime always makes me want to soften my crafting palette to sorbet colours and soft pastels, so I chose DYLON's French Lavender hand dye.

If you want to try this for yourself, first you will need to hand wash your feathers in the hottest water you can bear, along with a good dousing of detergent - washing-up liquid is fine.  You need to remove the natural oils from the feathers which would repel the water, and prevent the dye from taking.

Once washed, simply follow the packet instructions, and dye them in an old bowl.


After the allotted time, remove, rinse and leave to dry on some kitchen paper.

I found that lighter coloured feathers worked best, showing the pale purple colour off to it's best.


Although, I do like the two-tone results of these pigeon feathers.


Finer, wispier feathers didn't seem to take the dye as well, but they still take on the faintest of coloured tinge.

Try using your coloured feathers to make a 'quill' pen.  Simply snip off the end, cut down a partially used biro-style pen, and insert it into the base of the spine shaft.  A little dab of glue will hold it in place.


Or, you could make a feather headdress, perfect for role play and dressing up.  To make this, I simply used a glue gun and stuck down the feathers inside the fold of some bias binding.


You could use your dyed feathers to add to floral arrangements, make door wreaths, add to dream catchers, make jewellery and corsages...

What would you use them for and which colour would you choose?

Disclosure: Please see my disclosure page.  I have an ongoing relationship with DYLON as my sponsors.  All opinions, photos and ideas are my own.

Wednesday, 3 April 2013

Announcing my Cybher sponsor

I am so thrilled to announce that DYLON will be sponsoring Me and My Shadow again this year to attend the Cybher conference.

I had such a wonderful time working with them last year, and have truly loved being an ambassador for their fabric and craft products.

Sometimes, when you really believe in a brand and its products, it just feels right to team up with them, and I'm honoured they've chosen to work with me again.

They give me lots of creative freedom to come up with craft ideas and try new things, which in turn I hope encourages you to have a go.

I love that people contact me on Twitter and Facebook, asking advice about anything from dyeing their curtains, to how to use the puff paints, and I've become known as the DYLON Queen.

Sophie Cotgrove, Brand Manager at DYLON had these lovely words to say:

"We're huge fans of Liz's blog and never cease to be impressed by the wonderful projects she comes up with using our fabric dyes, paints and pens,  We're thrilled to be sponsoring Liz once again this year, so that she can attend Cybher and come together with other influential bloggers".

Wow!  Thank you so much DYLON.  I have my thinking cap on already for loads of new projects and inspiration for the coming year.

We're going on a feather hunt!

I'm a big believer in getting kids outdoors.  Allowing them fresh air, exercise and the chance to connect with the seasons and the natural world.

An important approach to this aim is to show them that getting cold and wet is not something to be feared.  Our schools seem to be complicit in isolating our children from the weather, and so you'll hear expressions such as 'wet breaks' and 'snow days' making the elements something to be feared.

Of course, the Old Man has to go one step further with this principle of embracing the cold and wet, so while he was busy doing this with a friend...


...Ruby and myself spent some time feeding the ducks and the swans and admiring their beauty.


We had a mission that day, and that was to find some feathers for a craft project.


We asked them nicely, but even in exchange for bread, they weren't giving them up.


So we ambled along the riverbank, picking up those we found.


The daffodils were out and the weeping willows were bursting into life.  Finally, finally, I think spring is here.

Linking up with Country Kids.


Country Kids from Coombe Mill Family Farm Holidays Cornwall

Tuesday, 2 April 2013

How to make a vintage style secret book hideaway


Like most 5 year old children, Ruby loves to hide things.  She adores stashing her 'treasure' in secret places and I'm forever turning up little piles of random tiny toys, notes and pictures.

So, given that the latest craft hang-out over with Red Ted Art was themed 'cereal boxes' I thought I'd make a secret hideaway store.

It may not be everyone who is able to bring themselves to disembowel an antique book, but my local second-hand store has a little rack of dilapidated works, perfect for this purpose.  And lets face it, if nobody came along to upcycle them, they'd end up in the trash.


If you can't get hold of a suitable broken book, then you could do a Google image search for a free downloadable picture of a book spine to print and use instead.  I like the free images here.  You don't need to use the front and back book boards like I have, just the spine will do.


So, you will need:

A cereal-type cardboard box
An old, broken book (or downloaded image) - check the width of the spine against the width of the box
Some paint (optional)

You will also need some sort of glue - I used a hot glue gun.

First cut down your box to the required size, and cut off the top flaps.  Then paint it to match the book spine and boards - this is not strictly necessary but it will look neater and make the box more inconspicuous if you have any peeking out.


Then lay the box in position, making sure the bottom edge is lined up with the bottom of the spine - in my case I used the whole book cover.

Glue the spine onto the narrow edge of your box, and do likewise with the front and back cover if you're using them.

And there you have it.  From the book shelf you'd never know it was a secret hiding place full of treasures.  I think it's much nicer than those naff 'baked bean can safes' you get advertised in the home ware catalogues - you know the ones, that sell mobility aids, spider catchers and jam jar lid openers!

Take a look at the other crafty ladies - there are lots more ideas for cereal box crafts on the hang out video and in the links below.


Red Ted Art shares her shadow puppet theatre and her 'everlasting' picture frame
Playful Learners made another gorgeous puppet theatre
Plus 2 Point 4 showed us how to use a box as a weaving loom
Kids Chaos pulped her boxes to make some pots for her seedlings - love these, totally biodegradable and free!

 Thanks for reading, and in the immortal words of Beyonce (sort of) - If you like it, put a Pin on it. x

Monday, 1 April 2013

Magpie Monday - Easter Greetings


Hello Magpies.

I hope you're all having a wonderful Easter break.

Normal opening hours have been abandoned so I haven't managed anything this week, but please feel free to link up your second-hand finds below.


Hopefully normal service will be resumed next week.

Now, if you'll excuse me, I have chocolate to scoff.


Me and My Shadow