Pages

Friday, 30 November 2012

Enjoy your maternity in style


During pregnancy it is said a woman looks her most beautiful and the generic ‘glowing’ remarks start to fly. But if you have ever been pregnant you will know, you don’t feel too glowing every day, sometimes you just want to relax and be comfortable.

On those hard days, buying something for yourself and really getting dressed up can be a sure fire cure for the blues but for those of you out there finding it hard to get into the maternity style, here are some tips that suit everyone.

·     Hair – Having the perfect hair style every day can become a progressively hard task for mothers to be and is generally something that falls by the wayside especially in the latter stages of pregnancy. To make sure you always feel good about your shiny locks, it is a great idea, when you get to the mid-way stage when you feel your hair style may be slipping, to just go to the hairdressers. If you invest in a low maintenance yet really sleek and stylish look it can serve you through to the early stages of motherhood too.

·   Make-up – Thankfully, for most mothers, that glowing thing genuinely does apply. You will start craving more healthy foods and water which are generally good for your skin, with this; it means you can go for a more natural look. If you are not convinced, you should invest in some really nice make-up, you would be surprised at how much a simple product that costs a little more than the normal brand, can do for your complexion.

·    Clothes, shoes and accessories – When it comes to clothes, don’t stray too far from your normal style, yes you will have to make more purchases for your changing size but make sure you stick to what normally suits you. If there is a special occasion though, make sure you flaunt your new found curves and find fashionable maternity dresses on Tiffanyrose.com to compliment it. When it comes to shoes, it does have to be comfort over style unfortunately, so shelve those killer heels for the mean time and get some nice soft pumps.
      
      Disclosure:  This is a featured post from Tiffany Rose.  
      Please see more about my disclosure policy here. 
   

Little Mittens Advent Calendar

When your child has a dairy allergy, finding an advent calendar can be a right merry pain in the butt.

It's a tad humiliating in the shops when small child is clinging to your legs begging and pleading for the Hello Kitty one with chocolate shapes, but hopefully the one I've made will go some way to pacifying her.

Alternative Advent Calendar Handmade mini mittens

I'm pretty proud that I've managed to abandon my neat-freakery here, and produce a more relaxed (some might say disorganised) advent calendar.  I wanted the numbers to be jumbled like they are on the shop-bought cardboard ones, and also for it to look like lots of little yuletide folk had come in from the cold and abandoned their mittens.

It was made using an old red wool skirt, which I hot washed, traced mitten shape templates onto and then stitched front and back together.  I trimmed each with some white fun fur I had in my stash, and bought some little felt numbers from ebay.


Inside each mitten is a tiny Christmas book (from a junk shop!), and I'm popping in little hand written notes with treats for us to do together.

I have things like:

Have hot chocolate and marshmallows after school

Movie and Popcorn night

Paint Ruby's toenails (this will be her favourite I'm sure)

Bake cakes together

Play a board game

etc.

Can you help me think of any more?

Check out last year's matchbox advent calendar if you want more ideas.

Joining in with the Recycled Christmas link up.


Thursday, 29 November 2012

Christmas is a time for giving


Christmas is a time for families and for showing a loved one that you care. It is also the time of the year to give to other and be charitable. A lot of us have charities that we regularly donate to already, but for those who do not there are a lot of ways to participate and really make a difference to someone’s life.

Time is the most valuable thing we have, so as an alternative, you could always volunteer with your kids or family for a few weekends at a local charity store or organisation in the run-up to Christmas.

It is as easy as marching up to any local charity organisation and asking them how you can help. Make sure that if you decide to commit your time to do this, that you actually keep your word and meet up as arranged.

Local churches provide a lot of ways to get involved in the community during Christmas times and you do not have to be a regular member either. For example, a lot of churches ask people to fill a Christmas hamper for families in need within their network who might be going through a tough time.

It doesn’t necessarily have to be a Christmas hamper from interflora (unless you can afford it), but you can actually buy a basket and fill it up yourself, as they are quite easy to make.

If ever there was a time to give away some of your children’s clothes that no longer fit, then this is the time. Call around to any youth shelters or simply bring it in to a charity store in a washed and clean condition. Remember the old saying; one man’s trash is another man’s treasure.

Don’t worry so much about what you can and cannot afford, because big or small – it is always the thought that counts.

Disclosure:  This is a featured post from Interflora.  Please see more about my disclosure policy here. 

Sew Easy Sleepover Bed


I love it when I have a genius idea, especially if it solves 2 problems in 1.

Christmas coming means visitors and overnight guests and many of our friends now have children.  Once kids are beyond the stage of sleeping in travel cots, but still little enough that they don't like being away from their parents in a strange house (my house isn't that strange by the way) then sleeping arrangements become something of a pain.

I've seen lovely sleepover beds on Pinterest before, made using a line of pillows, but whilst cute, using yards and yards of fabric, pinning, hemming and stitching kind of put me off...

Recently I re-organised my linen cupboard (yes, my life really is that exciting) and put into practise another genius idea from Pinterest and good old Martha Stewart.


Basically, you match up your bed sets, and store a complete change of linen (pillowcases, sheet and duvet cover) inside one of the pillowcases.  It keeps things neat, tidy and organised and makes changing the beds a doddle - no more searching for that matching pillowcase..

Anyhow, I had a number of leftover pillowcases that were surplus to requirements, and all of varying shades of dingy white.

You're ahead of me aren't you?  Yes, hey presto you can make a kid's sleepover bed by simply stitching pillowcases together, so just 2 or 3 straight lines of sewing = extra bed for sleepovers.  You can manage 2 lines of sewing can't you?

To sort out the dingy colour, I first dyed the pillowcases.  If you haven't tried machine dying then you really need to give it a go.  So simple and so satisfying.

With DYLON's new limited edition pre-salted dyes, it's now even easier.  Grab your chosen shade from your haberdashery store, Wilkinson's branch or John Lewis and away you go.

I chose Mushroom Grey (other colours in the ready salted range are Rustic Red and Lake Blue).  The grey goes perfectly with my guest room decor and you know me - I have to be matchey-matchey!


There's also a plethora of other colours to choose from in the regular range, you'll just have to remember add some cooking salt to the machine drum.


One pack of dye was enough to colour 4 pillowcases, but in actual fact 3 would have probably given enough length for a child's sleepover bed.

Once dyed, dry and ironed, pin the long edges together and stitch until you have a long row of pillowcases.

Iron flat your seams.  I used 'Oxford' style cases which meant I could have a generous seam allowance, using the border part, but it you're using regular cases, use a smaller seam allowance to you don't take up too much of the pocket space where the pillow goes.

Add your pillows and Bob's your uncle, Fanny's your Aunt and little cousin Johnny has somewhere to sleep when they stay over!


Disclosure: Please see my page for full details.


Wednesday, 28 November 2012

Stocking Filler Ideas for the Hubby


You might be aware that Christmas is coming soon and you have probably started to buy gifts for the kids already, which I must add is a lot easier to buy than other gifts.

The time to buy your partner great gifts is fast approaching, and if you want to avoid the rush of worried customers desperate to buy anything they can get their hands on for their hubby, you should buy a gift as soon as you can.

While there’s still a little time to think about what you want to get your partner, what would be the perfect stocking filler for the man in your life? Here are some great suggestions to ease the stress of buying gifts for the hubby:

Gadgets – for the technology obsessive, an e-reader, tablet or even a shiny new smartphone like the Samsung Galaxy S3 could work as gifts.


Swimwear – small yet sporty, if your husband or boyfriend goes swimming or wants to hit the beach when it gets a little warmer outside, this is great. On second thought, you might want to join him so you might want to check out Fig Leaves swimwear section forwomen and see if you can find a discount or two.

Books – if you’ve decided against buying an e-reader such as a Kindle, you might want to buy your hubby an action thriller or perhaps the latest award-winning novel. Failing that, a non-fiction title about their favourite sport or history would work too.


Holiday tickets – plane or train tickets for an adventure holiday to a mountainous area like the Scottish Highlands for a weekend would be great, especially if they like going hiking or rock climbing. 

Tools – if your man’s into DIY, he will love a new set of tools including a hammer, screwdriver, coping saw and other things he can use to build shelves, furniture or even a bird table.


Okay, so I know most of these won’t fit into a stocking, but you could always make a little treasure map and stick it into the stocking.

Happy Shopping


Disclosure:  This is a featured post from Figleaves.  Please see more about my disclosure policy here.

Leapster GS Review

Like a lot of other parents this year, we've been debating whether or not to buy Ruby a tablet for Christmas. If so, which one?  It seems to be the must-have item for kids this year, with lots of manufacturers battling for our attention.

However, we've decided not to get her one this year.  Not because I have a problem with youngsters using technology - quite the opposite.  In fact, this post from The Boy and Me sums up my feelings much more eloquently than I could.  I think using computer equipment and technology is great for children.  For the youngsters it helps with fine motor skills, improves hand-eye coordination and ensures they are used to using equipment when they start school.

Ruby already plays all manner of educational and fun apps on my Ipad, so I really don't feel the need to buy her a tablet of her own.  Besides, if she gets one aged 4, where do we go from there?  I can't imagine what she'll be expecting next year!

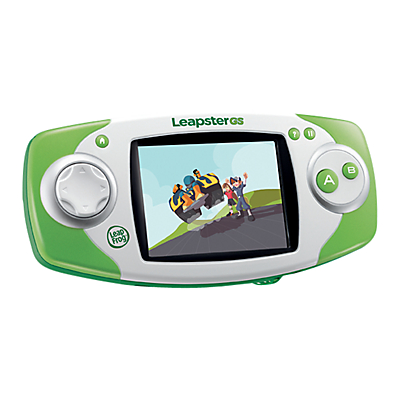
If you're having the same dilemma, then I'd recommend a hand-held gaming device.  The Leap Frog Leapster GS is excellent.  Compact enough to take out and about with you and sturdy enough for clumsy hands!


Recommended for children aged 4-9, Ruby took no time at all mastering it.  We set up her profile, took a photo using the built-in camera/video recorder, added her avatar and then she was away, working her way through the menu of pre-loaded games.  Kids amaze me sometimes!


There are over 300 fun educational apps which help with maths, creativity, reading, science, and problem solving.  Although some of them strike me as a bit pricey (I'm used to downloading apps for the Ipad for free or for pennies), I have to say we've had the device for over a month now and she's still very much enjoying the pre-loaded games.  It does give us a great idea for Christmas presents from the family though!

The device has 2GB of memory, enough to store plenty of photos which you can edit, share and even add to some of the game characters to put yourself in the action!  It takes 4 AA batteries and it doesn't seem to drain them too quickly either.

You can either use the touch-screen feature (something which all kids seem to be familiar with now: "Mummy your computer doesn't work" she once said stabbing at my laptop screen with her fingers), or the stylus pen which is cunningly attached to to console so you can't lose it.  Ruby also loves to play games which make use of the motion sensor too.

While we all use computers and mobiles in this house, we're not a big gaming family so I'm surprised at how quickly she's picked up the skills to get through various levels and difficulties of games.


Ruby is over the moon with her Leapster GS, and is constantly surprising me with facts and knowledge it's teaching her.

As a parent, I'm very happy with the educational content of the apps, the sturdiness of the device and the value for money (shop around, there are some great deals on at the moment).  My one gripe would be that it doesn't come with a charger/adapter but relies on non rechargeable batteries, although you can purchase charging kits separately   Oh, that and the slightly pricey apps (the cheapest being £3.50), but that's where grannies and aunties and uncles come in, right?

Disclosure: We were sent the Leapster GS Explorer pack for the purposes of this review.  However, all opinions are our own.


Monday, 26 November 2012

Magpie Monday - Crafty Shopper

It's been a crazy busy, but hugely fun weekend.

I agreed to help a friend out manning her stall at two craft fairs over the weekend.  One was a 'Vintage and Craft Fair' which had lots of vintage goodies, the other a school Christmas fair which had a great many bric-a-brac stalls - fatal, fatal, fatal!!

I should have just kept my feet rooted firmly to the ground and not let my roving eye fall on pretty toot that I didn't need, but... you know...

Ever the astute businesswoman (although I did sell some handmade items I'd taken along) on both days I managed to spend more than I'd made - which thrilled the Old Man greatly, as you can imagine.

On the Saturday, the fair was dead, with hardly a soul wondering around.  The stall holders were fighting for custom, but I don't think any of us did very well.

I popped over to a lady's stall as she was packing up and admired her beautiful, circular bevelled mirror priced at £10.  She offered it to me for £8, and then said "Oh sod it, I don't want to take it home, you can have it for a fiver".  Result!

I can't show you a picture because it's still stashed in the car with all the stock, but it's a beauty.  I need to add to my collection so I can make a feature display of them all a la Pinterest.

On the second day, I wondered around and found a lady selling off all manner of vintage loveliness.  She was practically giving the stuff away, so I got a stunning old ceramic jelly mould (still trying to replace those that got broken in the house move)


A blackbird pie funnel to add to my collection (I just need another 20 to make 4 and 20 blackbirds...)


And the best bit was this stunning silver plated art nouveau bowl.  It belongs to my friend who had it on our stall and I asked to buy it from her.  Unfortunately I think I put her on the spot because she couldn't think of a price!


Also, as someone pointed out, it lent an 'element of style to the stall' - huh!  What about us glamorous sales people then?  Not stylish enough??


So, I have it on a sort of a loan scheme.  I'm allowed to display it at home, but she'll have it back for displaying items on her stall when she has another fair.  Win-win!

Have you found any second-hand loveliness lately?

Grab the badge and link up.


Me and My Shadow

Thursday, 22 November 2012

Warner Brother's DVD Treats

The very lovely people at Warner Bros. sent us some DVDs and we've been watching them over an over.

Although they were promoted for the Halloween season, they can be enjoyed year-round and would be a lovely treat to pop in the Christmas stocking.

I have to say, there's something wonderful about seeing my daughter enjoying cartoon characters from my childhood, and these DVDs are ones we all enjoy together as a family.

Tom and Jerry Trick & Treats had Ruby literally howling with laughter.  It was a pure joy to hear.


Say what you like about the violence between Tom and Jerry - but it never did me any harm!

Simple tales of cat v mouse and mouse outsmarting cat are timeless.

Containing 22 cartoons, this will make a wonderful addition to your home entertainment collection.

We were also sent a Scooby-Doo movie - Big Top Scooby-Doo.  This one is classified as PG rating, but Ruby aged 4 and a half loved it.


Expect all the usual super-sleuthing from the Mystery Inc. gang, and some scaredy-cat action from Shaggy.

This DVD has the added bonus of the Ultra-Violet feature, which means that you can instantly stream and download it to a number of different devices and share with friends.  Look out for the UV label on Warner Bros DVDs.

Disclosure: We were sent these titles for the purposes of this review.  All opinions are my own.

Tuesday, 20 November 2012

Thrifty Tweed Door-Stop Tutorial


If you're looking for an on-trend Christmas gift idea that costs practically nothing but looks amazing, then have a go at this door-stop made using old clothing.

I love all the tweeds and tartans that are about in the shops, but to buy one of these handmade door stops in the stores will cost you anything up to £40.  Mine cost just pennies!


I used an old granny wool tartan skirt that I picked up at a jumble sale, and some (very out of date) dried lentils I found in my recent kitchen cupboard clear-out.  If you're not quite such a slovenly domestic goddess as me, you'll be able to buy lentils, rice or other pulses at the supermarket.  The cheapest I've found is supermarket own brand value rice at 40p per kilo.

I've included step-by-step instructions but it's really not complicated - you should be able to knock one of these up in just over and hour.

First cut out your fabric pieces - you'll need 4 sides (measuring 20 x 15 cm) 2 squares for the top and bottom (measuring 15 x 15 cm) and one piece for the handle (measuring 15 x 12 cm).


I recommend making templates out of cardboard, because once you see how easy these are to make, I guarantee you'll want to make more!

Once your pieces are cut, iron out any creases.  Take your handle piece and right-side down, fold over the long edges by about 1 cm to make a neat edge, and then fold the whole piece in half length ways to give you a handle strap.  Iron to keep the creases in place.


Next, sew your 4 rectangular piece sides together using a 1.5 cm seam allowance - pin along the long edge (right sides together) and straight stitch each until you have a long strip of pieces.  Finally, join the two ends in the same way so you're left with an inside-out bottomless and topless cube. (Well, not exactly a cube as it's rectangular, but you get what I mean)


Take your handle and carefully stitch near the edge of the long side to keep it in place.


Pin your handle in the centre of one of the square pieces (right sides up) to form the top of your door stop.  Take care to line up any pattern on the fabric.  Sew the handle on, stitching a little rectangle at each end for added strength.


Take your time stitching on the top and bottom.  Make sure you have the right sides facing inwards, and pin and stitch each side of the square one at a time or you'll get snarled up in the corners.  Use a 1.5 cm seam allowance again, and continue pinning and stitching each side of the square until you're done.


At this point it's a good idea to turn it right side out to make sure everything is correct and you're happy with your stitching.

Turn it inside out again and repeat the process for the bottom section.  On the last side, stitch from each corner, leaving a gap in the middle of about 6 or 7 cm.

Pop your hand through the gap and grab the handle to easily turn it the right way round.  Gently poke out the corners with your fingers and fill with your lentils (you could use any dried pulses, rice, sand or even fine gravel).  Based on these dimensions, I used approximately 1.5 - 2kg of lentils.


Slip stitch the gap closed and you're done.  Stand back and admire you're thrifty handiwork.

Further ideas:

  • Why not add some scent by adding some dried lavender to the stuffing, or steeping your rice etc in a lidded container with some drops of essential oil before filling.
  • Experiment with different fabrics - they need to be heavy weight but look out for old tweed jackets, wool flannel suits, pinstripes, woven wool blankets or tartan kilts.
  • Make a shabby chic version by using old floral curtains.
  • Experiment with different sizes.

Let me know how you get on.


Monday, 19 November 2012

Magpie Monday - Christmas is coming!

Phew, I managed to break my duck from last week.

Popping in the Save the Children shop, their festive window display made me feel quite Christmassy.

I managed to find this lovely silver candlestick for £1.99.  It's only Ikea but it will go nicely with my other candlesticks and make a lovely Christmas fire hazard display with loads of white candles.  I'm also on the hunt for any wooden or ceramic ones this shape that I can spray silver.


I also grabbed this red cake stand for £2.50.


Again, it's modern, but a reproduction of the vintage chrome folding fan cake stands.  It closes down quite flat so I can hide this away in the cupboard and the Old Man won't know I've bought yet another cake holder.  I thought it would look lovely with some homemade mice pies on.

Are you feeling all Christmasy yet?  Did you have any festive finds?

Grab the badge and link up.


Me and My Shadow

Friday, 16 November 2012

We Love Forests!


If you go down to the woods today... you're sure of an action-packed day of outdoor fun.

Last week we visited our local Forestry Commission woodland, Salcey Forest in Northamptonshire. A beautiful ancient woodland, this was originally a medieval royal hunting forest, but today can be enjoyed by young and old alike.

Of course, you should never start an expedition on an empty stomach, so we popped in to the cafe first to fortify ourselves.


The food was delicious, and there was a wide selection of hearty, homemade treats on offer.  I found the prices to be reasonable - we ordered a jacket potato with beans and an apple juice for Ruby, and myself and the Old Man each had a homemade soup and a sandwich with hot chocolate.  Costing less than £20 I thought this was good value - the food quality was very good.

We bought some slices of cake to pop in our pockets - for emergencies - and off we went to explore.


There is a large playground area right by the car park/cafe but unfortunately Ruby struggled with it.  It's very high and quite adventurous so I think maybe one for older kids.


No matter, who needs play bark and climbing frames when you can play in the forest.

Ruby had a wonderful time searching for leaves and learnt all about the different shapes and characteristics, as well as learning about deciduous and evergreen trees.


There are lots of free activity sheets available which help you get the most out of your visit.  We searched for different colours, and whilst we fully expected to find oranges; yellows and browns, there were some more unusual colours to be spotted too.


We had fun learning how to measure a tree (check out Science Sparks for a full explanation on this), and knowing that one of my paces equals about a metre, we decided this tree must be a whopping 25 metres tall.


We counted rings on felled trees to work out how old they might have been.


Straying from the beaten track, there was a magical world of mushrooms and fairy rings to be found nestled in the soft, spongy pine needle covered ground.


But by far our favourite part of Salcey is the tree top walk.  An softly sloping elevated walkway which winds up 15 metres high in the treetops.  From here you can come face-to-face with squirrels harvesting for winter, and see the tree canopy from above.


With amazing views over the countryside it's well worth doing.  Apart from the final viewing platform at the very top which is accessible by stairs, the walk way is pushchair and wheelchair friendly.


We had a wonderful, magical day.  Why not pull on your wellies, wrap up warm and explore the colours of autumn before they fade for another year.


Entry to Salcey Forest is free and car parking is £2.

Disclosure: We were sent a Discovery pass and pack as part of our role as Forestry Commission Review Bloggers.


Linking up with other outdoor fun at Country Kids.


Country Kids from Coombe Mill Family Farm Holidays Cornwall