Friday, 25 March 2011

Willvin - Swedish Design for Parents

 
I was recently asked to review a changing bag for Willvin, and although we don't necessarily need a specific changing bag now Ruby is toilet trained, I was still excited to take up the challenge.

 
I've been coveting these stylish bags for ages now, and after having first hand experience of one, I now really wish I'd invested in one when she was a baby.  Full of practical storage ideas it would have also been perfect as my maternity hospital bag.

 
I was sent the Willvin Magnificent bag (in beige leatherette) - they did offer to send one without the zipped compartment underneath (typically used for wet clothes and nappies), but I was pretty sure I could come up with other uses for this section.


Sorry folks - those of you with kids still in nappies, might be disappointed to hear this, but after potty training I still seem to spend half my life carrying wet things around with me!  Here are some uses I've thought of for the bottom section - some I have tried and others I will no doubt be trying in the not too distant future:

 
  • Wet welly boots
  • Damp umbrella
  • Wet clothes after car-sickness incidents
  • Storing washbag on overnight trips & long journeys
  • Wet clothes after exuberant water play at nursery
  • Wet clothes after juice spillage incidents
  • Opened and unfinished bottles of drink
  • Wet shoes and socks after seaside paddling
  • Damp costume and towel after swimming
  • Dog's collapsible water bowl on long walks...

 
I'm sure I will be adding to this list as time goes on.

 
The  bag is a great unisex design, which means Daddy is happy to take turns carrying it.  It is perfect for days out with easy access compartments on the side for drinks and snacks, front pockets to keep toys or little books handy and sections inside so I can combine all my usual handbag contents into the one bag.


I have even used it out and about on my own, and it is much better than my usual handbag - I'm guilty of hurling everything in willy-nilly usually, them have to scrabble around to find my phone/keys/pen.  This bag comfortably holds my laptop, my camera, purse, phone, make-up, keys etc etc and there are neat internal pockets to keep it all organised.

 
Granted, it's not a cheap bag, but I genuinely believe this will last you for years and will turn out to be a great investment.

 
Sponsored post- I was sent the changing bag free of charge for the purposes of this review. However, the views and opinions expressed are my own and are accurate and honest.

Thursday, 24 March 2011

How to make beautiful fabric flowers

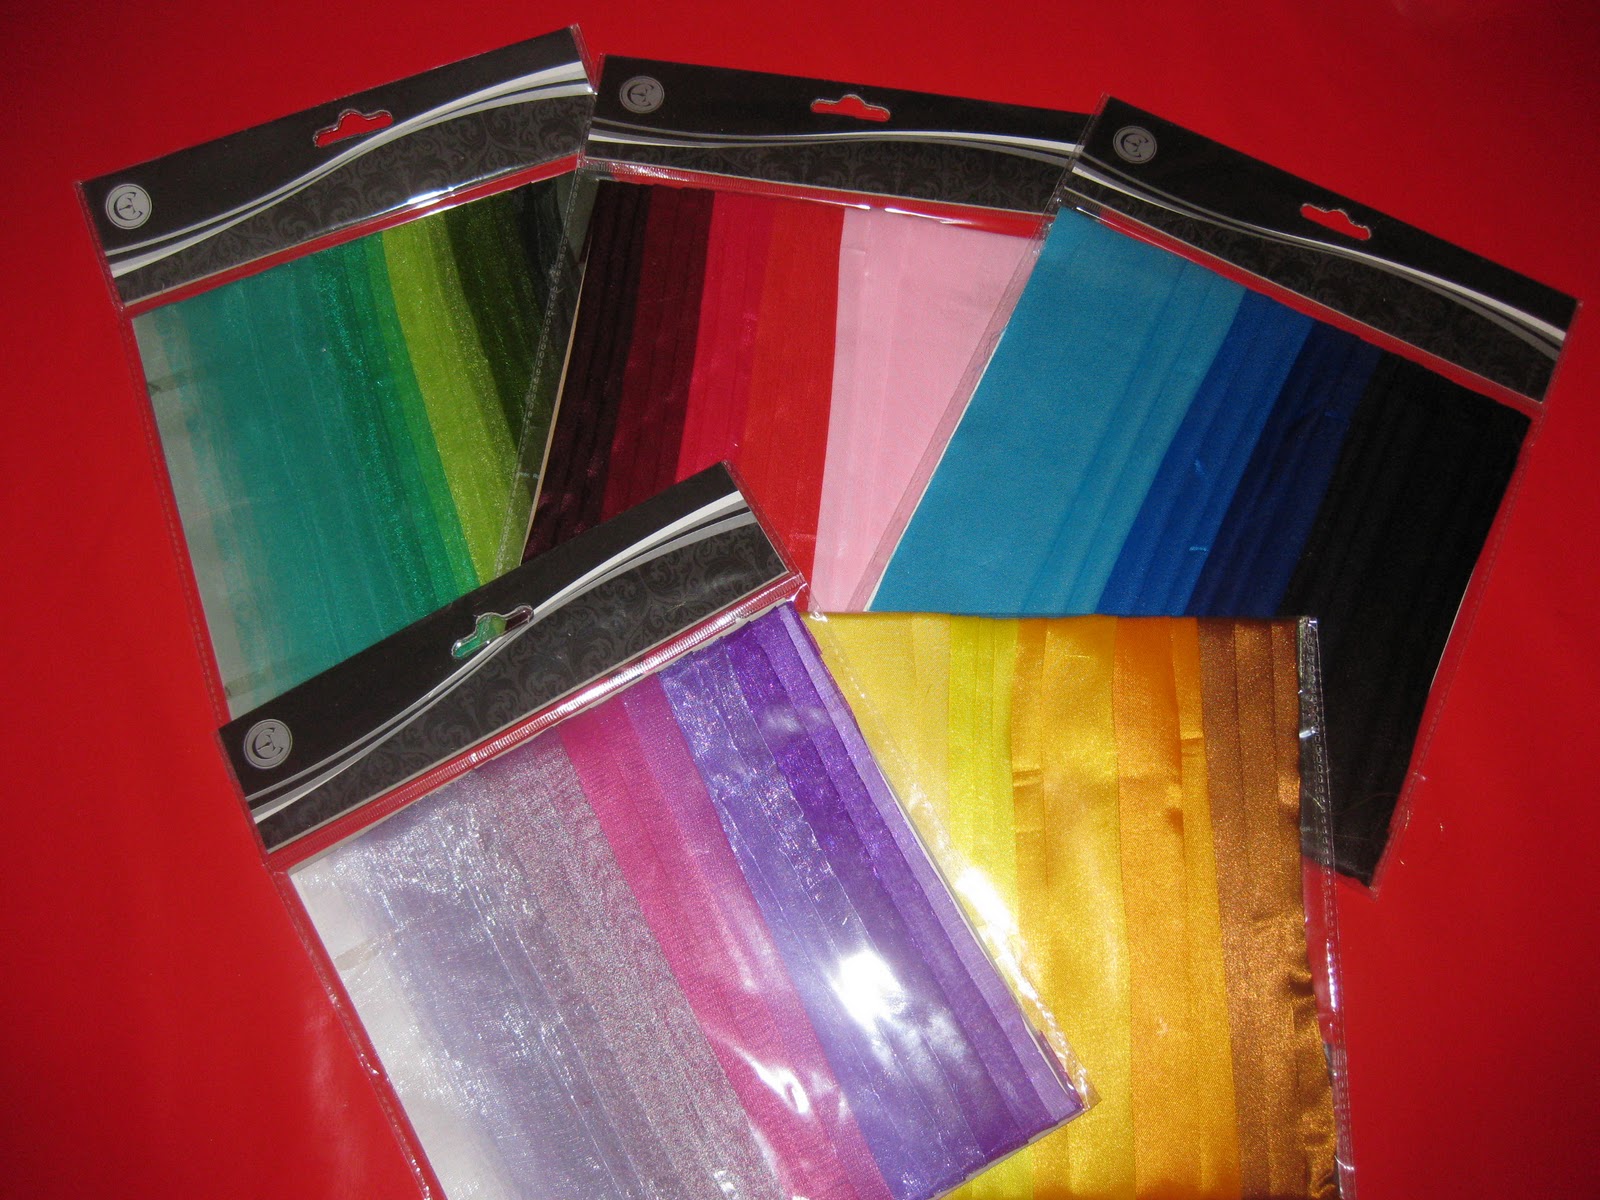
On one of my recent forays in our local Poundland shop, I spotted packs of beautiful coloured organza strips.  I loaded up my basket with packs of purples, blues, yellows, greens and reds.


They have now been sitting in the craft cupboard for a few weeks while I pondered what to do with them. After a trawl through google, I stumbled across a lovely blog tutorial showing how to make fabric flowers.

Simply Vintage Girl gives a very professional tutorial which is easy to follow, however, one of the links made my computer go a bit loopy with virus alerts.  Readers of my blog are not used to such professional 'how-to's', so in my own inimitably, wobbly style, I shall take you through the steps here, and give you some tips I have picked up already in my very early career of fabric flower production.

I do love this craft already.  It is so simple, requires no real precision, artistic skill, appeals to my pyromaniac tendencies, is wonderfully relaxing, gives very pleasing results and is highly addictive! Perfect.

Here's what you'll need:

  • Synthetic silky fabric
  • Card for template making
  • Needle and thread
  • Buttons or beads
  • A candle or tea light
  • Scissors

To begin you'll need to make your circle templates.  For possibly the first time ever since leaving school, I have found a use for my compass - my old maths teacher would be so proud!  If you are using the fabric strips from Poundland, I've found you can get 6 circles of decreasing diameter, with the largest being approx 6.5cm and the smallest 4cm. I wouldn't recommend going much smaller than this, as it makes the later stages quite difficult (and dangerous!).  Experiment with different sizes and amounts of circles - the more circles you use, the 'fuller' the flower.  As a guide, this finished flower will be about 1cm smaller than your largest disc.

Draw around your templates directly onto the fabric and cut out.  You don't need to worry too much about pen lines (biro pen works well) as these shouldn't show.  Also, precise cutting is not too important as you are not creating perfectly uniform petals.

Once you have all your discs cut, snip your 'petals' by cutting into the circle to about halfway.  It's up to you how many snips you make, but try to space them evenly around the circle - 5 or 6 works well.


Next comes the fun part!!  Hold your fabric between thumb and forefinger about 3 or 4 inches above a candle flame.  Rotate the circle around, and you'll see the petals start to curl up under the heat.  BE VERY CAREFUL!!  Clearly, this is not a craft for kids!  It is very easy to catch the fabric alight, so make sure you keep turning.  If you do catch alight - blow it out! I can assure you trying to put it out with your fingers is not a good idea as you'll end up with molten fabric stuck to you (doh!).  Don't worry if some curl inwards and some outwards, as you can turn them back after it's cooled.  If a petal does accidentally catch light, it is usually salvageable by snipping the burnt edge off with scissors!


Continue until you have curled the edges of all your discs.


Then assemble your flower in your hand, starting with the largest and layering. 


When you're happy with the arrangement, take a needle and thread and put a couple of stitches in the centre to secure.  Again, this doesn't have to be too neat as you'll cover it with a button.


Finally, stitch on a button or bead to make the centre.  This is a great way for me to use some of my vintage buttons, and I'm going to have a lovely time matching buttons to fabric!

Et voila!


I'm totally hooked on these now. But that's fine as I have thought of a million and one ways to use them.  You can stitch them to hair slides and bobbles, sew onto bags, make brooches, stick to magnets and pegs for noticeboards....

I'm linking this post up to White Lily Green who has inspired me to find some time to craft for myself! Pop along and see what else takes your fancy. x
Inspire Me Beautiful

Easter Chick

After making our Spot the Dog, I thought it might be nice to attempt a similar picture with a seasonal Easter chick.


I didn't learn my lesson after googling for pictures of rabbits - trust me, typing in 'cute chicks' gives some pretty interesting results!

We used:
  • Card (recycled cereal box in our case)
  • Paint
  • Split pin brass paper clips (you can buy these in WHSmiths, Rymans, Colemans etc)
  • Felt pen for details or googly eyes and felt piece for beak

I drew a basic oval shape for the chick's body, and then two wings and feet.


Cut out the shapes in card, and make holes where shown (you can use a hole punch or the old Blue Peter 'pencil and a lump of blu-tac' trick).


Ruby then painted the body and wings in bright yellow, and when done we added some red to the paint so the feet could be painted orange.


Allow to dry.


Assemble your chick using the split pins.


Once assembled you can draw on the eyes and beak.  However, I have quite a fondness for googly eyes, and when I spotted these in the supermarket the other day, I had to have them!  How cool are these?


Ruby selected the yellow lidded eyes with cute lashes and helped stick these on. Together with a triangle of orange felt for the nose, our chick is complete.

Meet Mabel.  She's rather shy.


I'm linking up with Red Ted Art. Check out the blog for loads of fab kid's craft ideas, and Thinly Spread's Something for the Weekend.


Thinly Spread

Wednesday, 23 March 2011

Winner of the Crafty Kid Book...

I had a huge amount of entries for this competition so apologies for the delay in announcing the winner.


I'd love to say I've been too busy to do it, but the truth is the past few nights I've had a couple of glasses of vino and been in incapable to counting up the entries.  A rare occurrence I can assure you!

So, without further ado, Random.org has spoken...


The winner is Lakota of Faith Hope and Charity Shopping.  Congratulations!! Please get in touch via DM and I will mail your lovely book to you.

Thanks everyone for entering, more competitions coming soon. x

Crufts - a breed apart

As you know, as a dog-lover I was thrilled to be asked to become a Crufts Mum.

On Sunday 13th March we got the chance to celebrate all things canine and attend the show at Birmingham NEC.


It was the day after Ruby's birthday, and after a busy day previously in London, she slept in the car on the 2 hour drive there.  She woke up just as we were pulling into the car park which was adorned with huge banners and posters of dogs, one of which for some bizarre reason she was convinced was a rabbit.  We spent quite some time explaining to her on the shuttle bus to the entrance that there were unlikely to be any rabbits at the event - much to the amusement of other passengers on the bus.

Luckily she wasn't disappointed - there were more than enough dogs to capture her imagination, and once we met the other lovely bloggers (Roz from Kin Hodgkins, Fi from Childcare is Fun, Louise from Rock and Roll Baby World and Maria from Mummy's Busy World) and their lovely children, she had new friends to play with and charge around with.


We had a lovely meal courtesy of the Kennel Club, and a chance to chat and get to know all the bloggers that I've been tweeting with for so long.  Then it was off around the show.


So much to see, do and buy!!  There were some slightly, shall we say, unusual sights too.  Now, I love my dog, but I think there is a limit!  We walked past an uber-glam young woman pushing a very covetable funky lime green three-wheeler buggy.  I gave it an admiring backwards glance, but was staggered when I spotted my other half mouthing to me "Oh my God, did you see that??"  Unlike me, he doesn't have a fetish for stylish buggies, so I wondered what on earth he was going on about.  Turns out this lady was not pushing her baby, but her dog in the buggy.  Yes, you heard correctly.   And don't even get me started on the stall that was selling entire outfits for pampered pooches!

Anyway, all that added to the experience, and we did purchase some very sensible (read boring) doggy rocks to put in Ella's water bowl and hopefully eliminate the yellow wee burn from our lawn.

Sadly the agility contest and best in show performances didn't start until 5pm and there was a long queue.  After such a busy day Ruby was not up for standing in line so we didn't get to see that - although we have since watched in online.


All in all, a very nice day out - if incredibly tiring!  Many thanks to the Kennel Club and especially to Holly and Maria who looked after us so well.

Sponsored post - We received tickets to the show, lunch and a goody bag. However, all views are accurate and honest, and are my own opinion.

Tuesday, 22 March 2011

Easter biscuits - always have a Plan B!

For ages I've been wanting to try out some of those 'stained glass' biscuits. I've seen them in loads of recipe books and magazines, and it looks perfectly simple - cut shapes in your cookies and fill with crushed boiled sweets.  Simple right?

So, for possibly the first time ever I used cookie cutters to make...cookies.  Radical huh?

We made up a huge batch of gingerbread mix, using the basic recipe:

  • 350g/12oz plain flour, plus extra for dusting
  • 1 tsp bicarbonate of soda
  • ½ tsp salt
  • 2 tsp ground ginger
  • 100g/3½oz butter
  • 175g/6oz soft brown sugar
  • 1 free-range egg, beaten
  • 4 tbsp golden syrup


Start by stirring all the dry ingredients together.


Rub in the butter until you have breadcrumb-like texture (tickley fingers for those of you that are familiar with Katie-I-Can-Cook)

Beat the egg and syrup together in another bowl, then add.

Bring together with your hands to form a dough and turn out onto floured surface.


Next we went in search of sweeties.  Ruby turned her nose up at the pear drops I proffered, so the only other thing I could find that resembled boiled sweets was these:


We spent a happy few minutes bashing the living daylights out of them with a rolling pin, and then tipped the shards into bowls - keeping the colours separate.

Then back to the dough.  This was rolled out to about 1/4 inch thick, then Ruby cut the Easter Egg shapes out with the cutter. I bought a set of lovely Easter cookie cutters from Poundland. Hooray for Poundland!


We made a small hole near the top with a drinking straw so the cookies could be hung on ribbons.


Next, I cut shapes out of the 'eggs' and laid them on a baking tray with greaseproof paper.  The holes were filled with broken sweets, then they went into the oven for 10-12 minutes in a pre-heated the oven to 180C/350F/Gas 4.


When golden brown, they come out of the oven and are left to set on the tray, so the sweetie windows can harden.

I was so disappointed with how they come out!  They tasted great but looked shocking!   Clearly I hadn't put anywhere near enough broken sweets inside. Either that or it simply doesn't work with lollies!


We abandoned that plan, and used the rest of the dough to make regular gingerbread cookies.


For a brief while I got to admire their natural beauty.


But Ruby AKA Sprinkles Queen had other plans, so we set about making up lots of different coloured icing...


and she sprinkled to her hearts content!


Finally, we strung them on ribbon and hung them on a branch. What a yummy tree!


I'm linking this post up to Oui Chef over at Beckicklesie - the challenge this month is "Hansel and Gretel", admittedly it would have fit better if the windows had worked - but at least I tried!


Monday, 21 March 2011

Magpie Monday - Red or Read

It's Magpie Monday time again! Wow this week has flown by, and as I've been busy with party preparations for Ruby's birthday party (more about that later), I've not had much chance for mooching round the shops.

As mentioned in my last post, this weeks Magpie Monday has a theme. Courtesy of Kate the theme, should you wish to follow it is in honour of Comic Relief.  So my items this week are red, and a sneaky one at the end which certainly made me smile with happiness.

If you don't have anything to fit the theme, then remember, it's totally optional- I'd love to see your thrifty finds whatever they may be.

First up, more clothes for Ruby.  As her name lends itself so well, I quite like to dress her in red.  She seems to have had a sudden growth spurt and shot up, so a lot of her clothes recently seem too short.  I really must find a couple of hours to go through her wardrobe and take some stuff to the charity shop.

I found this sweet little smock dress/top on Sunday. I think she'll be wearing it over jeans - leggings are not her friend!


It has a French label, and it's made of nice cool linen-type fabric, with 2 big patch pockets on the front.  I think it's very sweet.

Second top is a basic supermarket label.  But she always needs more long-sleeved Ts as she wears them under everything! £1 in Age Concern.


I also spotted another Mini Boden top in the same shop, so I snapped that up too for £2.


I really love this one. It's cheesecloth type fabric, printed with pink and red roses, and finished with a pink blanket stitch around the hem, and little crosses around the neckline - like I used to do in school.

Finally, as I was at the counter paying for these items, I happened to gaze around to the bookshelf.  My eyes instantly fixed on this book and I let out a little yelp, grabbed it off the shelf and added it to the pile.


Now, this may not seem very exciting to you, but I, along with several other bloggers are undertaking a challenge for Proctor and Gamble.  For one day we have to live like a 1930's housewife and abandon all our modern conveniences.  Like a jobbing actresss, I'm taking this role very seriously and will be researching it meticulously!  Watch this space.

Can't you just see me doing this while the old man lounges in the armchair reading the paper and smoking a pipe.


No, me neither.  I suspect I shall be much more like this:


I'd love you to join in and share your 2nd-hand finds.  Please grab the badge below and add your link.  Or, if you don't have a blog you can post a picture on Twitter using the hashtag #MagpieMonday or link a photo on the blog Facebook page.

Happy thrifting x


Me and My Shadow
Grab my button
and link to my blog